To perform this you need: 1-3" ball, 1-2", 1-1", and 2-½" balls
|
NOTE: The photo views are labeled FRONT and REAR. The FRONT photos are from the audience viewpoint and Not a mirror image. The REAR photos are what the Magician sees.
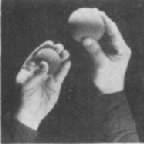
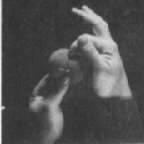
SETUP: Place the two smaller balls in your front left trouser pocket in the upper left corner. The 1' ball should be placed in the upper right corner of the same pocket, The 2' ball is in the left hand as illustrated in PHOTO 01 (REAR) the 3" ball is in the right hand. If you are seated, you may have the 1" and ½" balls in your lap instead of Your' pocket. |
 rearview #1 rearview #1 |
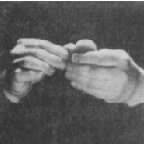
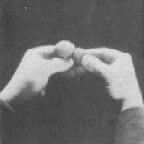
Step l) – with the 2" ball in your left hand make sure the back of your hand is towards the audience and your fingers are close together in order to conceal the ball from them. The left hand starts at the magician's waist and rises to meet the 3" ball held in the right hand. |
 frontview #1 frontview #1 |
rearview #2 |
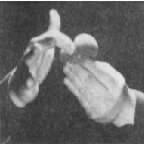
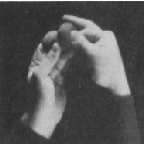
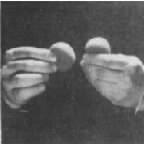
Step 2) – Pass the 3" ball to the left hand. As illustrated in PHOTO 02 (REAR), the 3" ball is held by the fingertips above the 2" ball. PH0T0 2 (FRONT) shows the fingers clenched so as not to flash the still concealed 2' ball. |
frontview #2 |
rearview #3 |
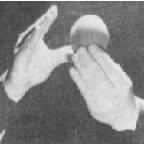
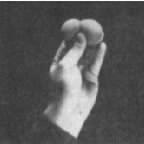
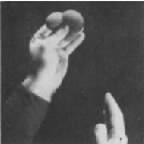
Step 3) – Tuck a little section of the 3" ball behind the thumb of your left hand with the index finger of the right hand. Continue this creasing motion from rear to front. as illustrated in PHOTO 03 (REAR) and (FRONT) , Finally tucking the tiny pinch of the 3" ball gripped by the clenched fingertips. The object of this tucking is to start a line of cleavage. The grip on the ball after you have "sculpted" the center of the 3" ball retains it to look like 2 balls (the real 2" ball is still under the large ball at this time). |
frontview #3 |
rearview #4 |
Step 4) – The following move is why you've purchased this effect. It is a visible switch of half of the 3" ball for the 2" ball.
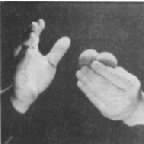
Note: Many people hide the balls totally with their fingers as they do this. The impact of the move is lost if the switch is hidden. Place the right thumb below the 2" ball and the right forefinger above the right half of the 3" ball. As illustrated in PHOTO 05 (rear). Pinch slightly and twist the half portion of the 3' ball forward behind closed fingertips as the 2" ball comes into view PHOTOS #6 (REAR) and #6(FRONT) . It will seem as though you have twisted the 3' ball like a dial. The audience will not be aware of the switch. See PHOTOS 04 (FRONT) and 07 (FRONT) for a before and after comparison. Practice this. |

frontview #4 |
rearview #5 |
Step 5) – Once twisted, maintain the pinched grip on the 3" ball as well as retaining the 2" ball with the left fingertips. Also switch the fingers' position from that of pointing up to that of pointing to the side as illustrated in PHOTOS 08 (REAR) and (FRONT) |
frontview #5 |
rearview #6 |
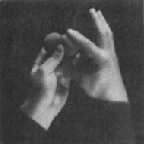
step 6) – Grasp the 2" ball with the right hand. Rub this ball against the half of the 5" ball as you above the right hand forward. The rub will make it sound like the sponge being ripped half. (rearview #8) |

frontview #6 |
rearview #7 |
Step 7) – Place the left hand in the pocket where the other balls are, There you exchange the twisted 3" ball secretly for the l" ball. as you bring the hand up from the packet, assume the position as illustrated in PHOTO 01 (REAR) to repeat the moves over again. |
frontview #7 |
rearview #8
| Step 8) – Repeat Steps 1 to 7 again as you diminish the 1" ball take one of the 1/2' balls. |
 frontview #8 frontview #8 |
|
FINALE: You have several optional endings: You will have a l" ball in your left hand at the end af the Step 9 go to the pocket end leave the 1" ball while removing the 3" ball again. You hold the 1/2" ball on your right outstretched palm. Your le4t hand, with the palmed 5" ball, covers the 1/2" ball in your right hand. Put your cupped hands to your mouth as if blowing up a balloon. Lift your left hand at the same time and let the 3" ball expand. The l/2" ball below it will be hidden. |
The audience assumes that, at the end of each diminish, you placed the other half of the diminished ball into your pocket. Thus, at the end of the routine, the audience assumes that you have a 1/2" ball going to your left packet. Show the pinched 1" ball as the 1/2". Ball, then go to the pocket and get the "previously reduced 1" half". In reality, you are going to get the extra 1/2" ball provided. You may now bring both 1/2" and 1" ball into view and deposit both on the table alongside the 1/2" already in view. Next, remove the 2' ball from the pocket to show the various sizes you have created from the 3" ball. Choose any one of the three sizes on the table and go into your favorite sponge routine. |
|
Finale 2: Instead of bringing out the actual 2' ball (as suggested in the preceding option), take out a "Ball to Bunny" or "Ball to Square" effect (available from your local dealer). These shapes, when turned inside out, are in the shape of the 2" ball. Place this novelty ball (Gimmicked side to your face) in front of you. Take all the tabled balls and place them together in front of the gimmick. Turn the gimmick inside out again over the other balls. let the audience see flashes of red sponge as you reverse the gimmick and hide the hole with the balls inside. Spread your fingers to reveal the finale! |